• Twitter
  • Facebook
  • Google+
  • RSS Feed

Thursday, 26 February 2015

Tutorial with Vicky

During the tutorial I had with Vicky, I discussed the brief idea I had, which is to look into film scratching and manipulating an image on film. Taking this into consideration, Vicky took me into the film editing room where we can watch, edit and cut our film. I was briefly shown how to use the Steenbeck editing machine, which is used for film pieces.


Steenbeck machine.


Vicky then showed me an example of a film that uses the film scratching technique, in particular over faces which I found really visually interesting. The film, Irma Vep, is a remake of 'Les Vampires'. its a behind the scenes look of this process, using visual elements such as film scratching appear at different times during the film. The scratching is used predominantly for the visual effect side of the film. I feel this is an interesting alternative to the use of motion graphics or CGI. I read an interesting review of the film which states "It seems to function as a cinematic state of affairs, examining the functions and motivations behind the movies we see.". This is interesting because the film makes you think more about why certain elements are used, for example film manipulation such as scratching and the deeper meaning within a film. The film itself is of a low budget and shot in a short amount of time, which gives the film a rougher, more visually experimental look, which I liked about it. 
Screenshot from Irma Vep 


Trailer for Irma Vep

Tutorial with Rosie

During my brief tutorial I had with Rosie, I was told that the idea I wanted to center my piece around, which is manipulating film is an interesting but challenging idea to pursue. Rosie was helpful in giving me advice to go away and think more about the concept behind my idea and what I'm trying to say to the audience. She also contacted David Cooper, who enrolled us to the 'Samurai Blade' and 'Sony EX3' to hopefully induct me into using the film camera available at the university, so I can progress with making my film. I'm quite inexperienced with film camera's, so I'm pleased that Rosie got in contact with David. The next step to take is think of a narrative for my piece or think deeper about what message i'm trying to convey within my work. 

Tuesday, 24 February 2015

During today's Interactivity workshop we looked at making the ship and asteroids explode when they collide. We also looked at making a script that allowed multiple asteroids to spawn when playing our game.We began with a simple piece of coding called 'DestroyByContact' allowing our asteroid to disappear when its hit. 

Coding to destroy the asteroid.

We then tagged our boundary under 'Boundary' so the  boundary is separate meaning it won't keep the bolt.

Tagging the boundary.
This piece of coding allows for the asteroid to be destroyed.
This line of coding allows for an explosion option within our game, where we can attach theexplosion preset. We then added the explosion effect to our asteroid. 

This line of code allows for the ship to explode when it hits the asteroid. 
We then selected the player explosion preset, which is a larger explosion than the asteroid's explosion.


The next section of code allows for the ship to have a much larger explosion when it hits an asteroid

 
Making the speed negative also allowed for the asteroid to come towards us.

We then made the asteroid a prefab so we can have multiple identical asteroid's in our game rather than having to keep making another asteroid from scratch,


The next task we did was to create a ‘GameController’ empty object on our hierarchy and tag it as 'gamecontroller'. The game controller will be used to spawn multiple asteroids at once.

'GameController' tag. 
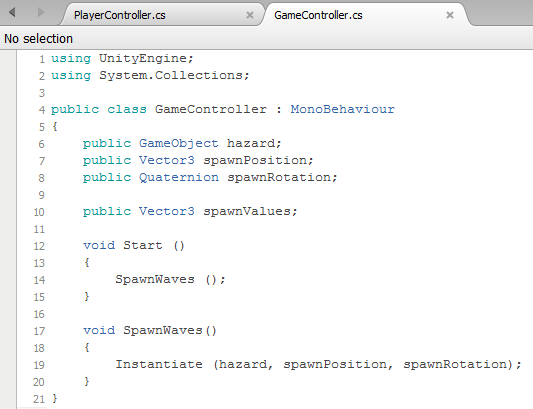
Original GameController script.
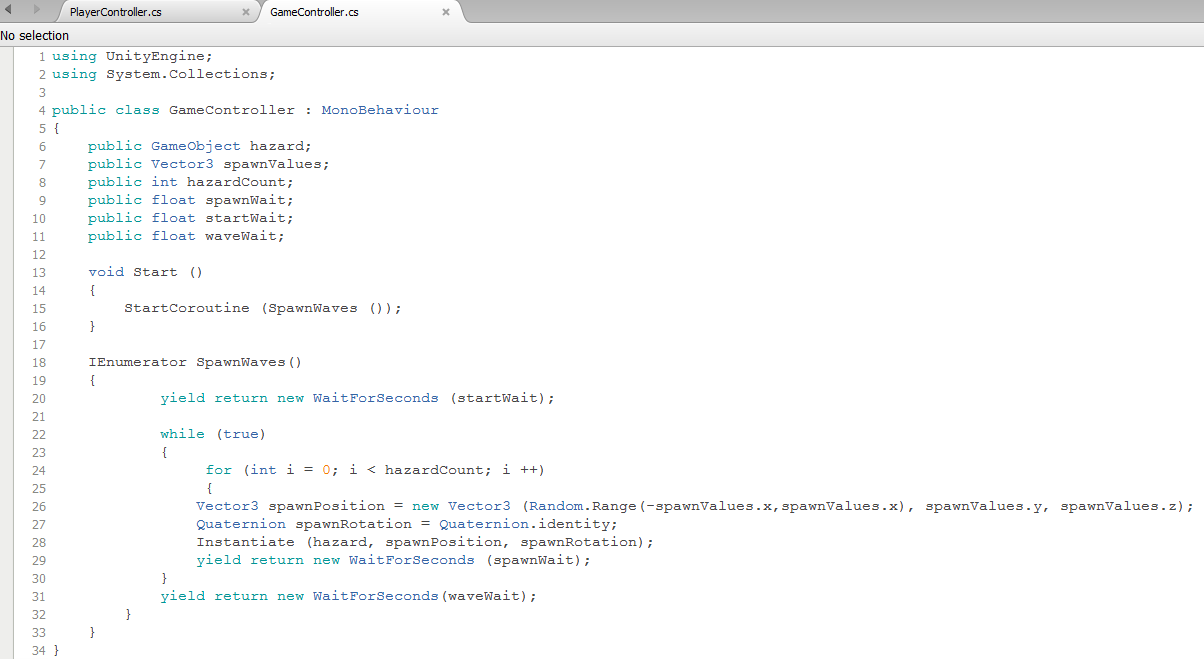
We then added elements to our existing ‘GameController’ to change the speed of how quickly the asteroid's spawn and for the waves of asteroids appearing to constantly loop.


Settings for the wave of asteroids.

Next lesson we will work on finishing our game by customizing our game by importing our own ships and asteroid's we've made using Maya.

Monday, 23 February 2015

During this lesson we looked at several different approaches we could take for the Fields and Frames project. One being stop-frame animation. Vicky set up a bottle on a table, started the recording and stopped after a few seconds. She did this several times then previewed the footage on Premiere. This was an interesting approach to stop-frame animation as i'm used to taking stills rather than video. The result was interesting as the water moved strangely across the screen because the water was moving at a different rate to the movement of the bottle.

Vicky then discussed 'Expanded/Perspectives' and gave us some examples of this:


'16mm loops- Scratch, Perforate, paint
Projectors share the same space as the audience
Audience encouraged participating in the making of a film
Body as a resource- mimic/build a tripod or a rig
Holding tools and technologies
Physical positions and viewing perspectives ‘upside down’'

We then looked at 'Reflexivity' and some example work that plays with the concept of Reflexivity, which is the concept of making the audience aware of what's going on behind the camera.


During this piece, you viewer can see the presence of the camera person, with someone waving across the screen as if they were the shutter on a camera, replicating the movement. 


We then looked at duration. A quote by Peter Gadal stated that 'There is a durational equivalence between shooting time and viewing time’ meaning there is equal duration between the shooting time of something and the time that it takes to view something.


We then looked at 'Pixilation', which is a is a stop motion technique where people, frame by frame, repeatedly posing while one or more frame is taken and changing pose slightly before the next frame or frames, thus resulting in a 'Glide' effect. 


Neighbours by Normal Mclaren is a good example as it uses comedic elements to interest the viewer, with a strange narrative about a battle to get a flower between two men. This was visually interesting at the time as this was seen as a real experimentation with time and stop-frame animation. 

We were shown a film called 'Girl From Moush', which was an interesting piece formed around the an english-speaking woman discussing what its like in her home country, Armenia, however she has never been there. Images appear of building's, churches , people, art etc. The audio includes Armenian music and her voice dubbed over experimental visuals, such as colour correction and flickering imagery. I like this piece for its visual experimentation and the manipulation of film. The film appears to be pulled through a projector, giving it the gittery visual effect. 


We looked at the physical materiality of a film strip. We named the parts of the film to recap from when we last used film and spoke about the components. The components of film consist of the celluloid (the chemicals which make up the image), the sprockets (Holes punched into the film so it can play through a projector), then frames (the part of the film where the image lies), optical sound (the strip on a piece a film that contains the sound within the film) and the chemicals on top of the film which is related to the visuals of the film. We lastly looked at the materiality of digital film, which relates to the pixels and the coding of a video. 

Tuesday, 17 February 2015

During our 5th lesson of interactivity we continued working on the laser beam for our game and later worked on importing an asteroid and making it float within the space.

We began by making a piece of coding called 'Mover', which will allow our laser beam to move on the game.


'Mover' code in game. 


Code for the mover script.

We then made a new prefab and called it 'Bolt' from the bolt currently on our game. Making the bolt a preset means that I can use more than one bolts without having to keep making a new object.


'Bolt' Asset. 


Multiple bolts added to my game.

We then made an empty object called 'SpawnPoint' to position our bolt. The piece of coding we used allowed the bolt to reload and shoot from the spawn point's position.


We then attached the bolt to the spaceship so that it was connected to the ship, meaning when the bolt shoots out, it will come from the front of the ship where the spawn point is.


SpawnPoint for the bolt attached to the ship


Making the empty object already attached have the 'Bolt' asset. 

The next piece coding we added allows us to change the fire rate as previously the bolt would constantly shoot from the ship.


Constant bolt fire resulting in hundreds of clones being made. 

The 'nextfire' piece of coding allows there to be a gap between how quickly the bolts shoot out.

Coding for change the fire rate so its not constant. 


'FireRate' set to '0.2' so that the rate of fire is not too slow but not too fast. 


                                        Video example of the spaceship working in game. 

We then created a boundary so that the bolt dies after it leaves the background rather than there being lots of bolts constantly moving away from the game. The boundary was named 'DestructionBoundary'. The piece of coding we used beginning with 'Destroy' allowed the bolt to be destroyed as it leaves the boundaries of the game.


Beginning of our boundary. 


Boundary made invisible, yet active around our game. 

'DestructionBoundary' Script in game


Coding to destroy the bolts as they leave the screen.

After this we made a new object called 'Asteroid' and imported an asteroid model onto our game. We then added a 'Capsule Collider' around the asteroid to make the asteroid move.


Asteroid on our game


'Capsule Collider' placed around the asteroid to make sure it can move. 

We then created a new script called 'RandomRotator' which will make the Asteroid turn during the game. The code was then dragged onto the asteroid. The game was then previewed and the asteroid moved accurately.


'RandomRotator' code in game.

'RandomRotator' code.

Next lesson we will be working on destroying the asteroids and adding explosion effects when the ship and asteroid explode.
 
© 2012. Design by Main-Blogger - Blogger Template and Blogging Stuff