To further develop my game I have done numerous things. I have made my background move, created a start menu where you press 'Play' to begin the game and I have created a pause button which freezes the game by pressing the 'P' key and unfreezes after you press the key again.
I began with making my background scroll across, to look like the ship is moving in space. To do this, Luke showed me a simple piece of coding.
 This 'ScrollSpeed' text allows for me to change the speed I want the background to go at in the game, for now set at '1' as shown under the void update. 'Vector2' for example simply means that the game is a 2-D game. The 'rendered.shared.Material.SetTextureOffset...' simply sets the positioning of the background, meaning it will move the background material in game.
I then moved onto making a simple menu for my game. To do this I needed to create a new scene and call it 'Play Game (Start Menu)

 I then changed the settings for the button around the text and the text around the button by changing the colour and highlighted colour of the button and the colour of the text to something more suitable. I also downloaded a free space font from 'Dafont.com' to make my game more space themed.


I finally created a simple pause function. To do this I created a new script called 'PauseScreen' and attached it to my Player to pause the game.
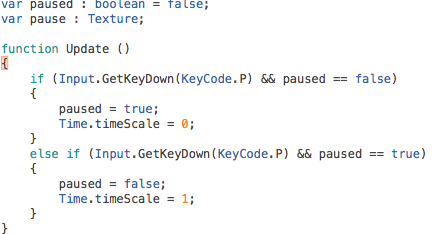 This script allows for the 'P' key to pause everything within the game (Input.GetKeyDown(KeyCode.P). The 'Time.timeScale =...' means the time taken for the game to pause and un-pause.
Overall i'm really pleased with the development i've made to my game (Adding my own ship/asteroid/UFO, changing the background, making it move, adding a pause/start function, having multiple objects fall and changing the score value of each object). I feel I understand coding a lot better now thanks to Luke and I would feel quite more confident than I have prior to the lessons in producing my own game in the future. When starting the project I found it difficult because I've had no previous experience in game programming, however I feel I have progressed well and now understand the basics of making a game. If I would've had more time I would've made an enemy ship or perhaps made the game multiplayer to further develop my game, which I may look into working on after the unit has been completed.
I began with making my background scroll across, to look like the ship is moving in space. To do this, Luke showed me a simple piece of coding.
I then moved onto making a simple menu for my game. To do this I needed to create a new scene and call it 'Play Game (Start Menu)
Unity file in game.
I then had to create a new UI Button by going from GameObject > UI > Button.
Settings for my button.
Setttings for my 'Text', with a custom font.
I then created an empty object and called it 'Manager' to allow the scene to change from one to another. I then created a 'Change Scene' script to allow this to happen. This was found through a YouTube tutorial on how to make a menu for your game.
I then attached this script to the manager and the 'Canvas', which is the collection of my button and text.
I then attached this script to the manager and the 'Canvas', which is the collection of my button and text.
'_Manager' in game.
'Change Scene' Script.
The script allows for it to use this scene and change it to the next. This is done by changing the build settings to allow the 'Play Game' scene to appear first, followed by my actual game. The 'Add Current' button adds my scene to the build so it will appear in the game when it runs.
The 'Build Settings' for my game
To make the scene change successfully, we have to add the manager to the left hand side, under 'Runtime Only' and add the 'Space Shooter' unity game to the 'ChangeScene.ChangeToScene' option in the drop down menu.
The settings to 'On Click ()'
Changing the option to 'ChangeToScene (string) to allow the actual game to appear after clicking the play game button.
I finally created a simple pause function. To do this I created a new script called 'PauseScreen' and attached it to my Player to pause the game.
Overall i'm really pleased with the development i've made to my game (Adding my own ship/asteroid/UFO, changing the background, making it move, adding a pause/start function, having multiple objects fall and changing the score value of each object). I feel I understand coding a lot better now thanks to Luke and I would feel quite more confident than I have prior to the lessons in producing my own game in the future. When starting the project I found it difficult because I've had no previous experience in game programming, however I feel I have progressed well and now understand the basics of making a game. If I would've had more time I would've made an enemy ship or perhaps made the game multiplayer to further develop my game, which I may look into working on after the unit has been completed.


.PNG)