• Twitter
  • Facebook
  • Google+
  • RSS Feed

Tuesday, 24 March 2015

During my tutorial with Vicky, we brainstormed ideas and thought about what I wanted to talk about in my piece further and she suggested the theme of using old technology and film styles in an innovative way, which really interests me as someone who has seen technology and film over my lifetime progress and change. She suggested more of Dryden Goodwin's work and an artist called Stan Vanderbeek.

I watched the piece 'Science friction' and enjoyed the cut and paste style animation within, which creatively brought out the message of the piece. I like this idea of bringing out the message of a piece creatively, which made me think about the different visual techniques I would like to include, being Pixillation, color manipulation and simple visual effects used though basic softwares of computers such as Photobooth. He explains the piece as: 


"The technological explosion of this last half-century, and the implied future are overwhelming, man is running the machines of his own invention... while the machine that is man... runs the risk of running wild"


After the tutorial I thought more about my project and what I will be filming. My piece will include:

. Visual effects such as pixillation, colour change, film scratching/film marks, change in resolution. 

. Voice-over dialogue of peoples opinions on the advancement of film, comparing old/new film, movement from celluloid to digital, advances in animatics/3D and so on. 

My list of questions include: 

"Opinions on actual film compared to digitalisation Do you think old film is dead? How film has progressed technically and visually? Opinions on anyone being able to create visual effects from home? Has this affected the industry? What are your opinions of using older films today and making them innovative and new?"


Saturday, 21 March 2015

Final outcome. 

At the start of the project I was concerned about what role I would be interesting in furthering my knowledge and skills in. I decided to take on the role of the camera man because I enjoy using new pieces of equipment i've never used before and I enjoy a challenge. I began by researching the role by looking at different pieces of camerawork which I could take inspiration from. I also took inspiration from the induction into the different equipment like the rigs as this came in handy when we began our shoot. Nigel's acting workshop was also really interest as it allowed us to get used to interacting professionally with people like actors and how to take control of a shoot. The different exercises also built up my confidence with working with people that I haven't worked with before and I learnt a few pieces of important terminology to use on set, like how to begin the filming of a scene and so on.
The making of the bricks 
Wallpaper set. 

After this we began building the set. For me this was something Id never done before so I was excited at giving it a go. I feel I contributed a lot to the building of the set, spending a lot of the time avaliable to us helping however I could, for example wallpaper the walls, make bricks and moving props around such as the televisions. I didn't imagine I would've spent as much time as I did on the building of the set, but I enjoyed the process. 
Building the set 

When it came to the shoot I was quite nervous as I was reliant on the group to produce the best shots I could. I was confident thanks to the induction into the camera, and thanks to Anne, in successfully using the camera to get a variation of shots. I felt the shoot was quite successful other than running over schedule time and difficulty of one shot due to the difficulty in stopping the panning upwards of the camera before it reached the top of the set and moving beyond that, showing outside the walls of the set. On the day of the shoot I interacted with the actor numerous times which I found helpful in building a relationship with the actor, something that was discussed in nigels workshop. Because of the different lighting arrangements I found it difficult to get the exact same lighting for some shots, which showed when it came to post- production. After the shoot there was some panic around getting the film done and fixing the clips in premiere due to the changing of the lighting and continuity of the shots. I feel I could've perhaps contributed more to the postproduction side of things even though that was not my role. I felt the issues we had were mainly due to a lack of communication between all of us, due to the starting of new projects becoming our focus.
    On set shot.
Induction into the equipment.
Nigel's acting workshop. 

Overall I feel I am more than happy with the input I gave into the project. I feel I was there through the whole production of the film and found myself helping on parts of the shoot that I didn't think I would've done so much or been interested in, such as the building of the set, which turned out to be quite interesting to do. If I could do the project again I would contribute more to the post-production side of the film, for example be there more for the editing of the film and give advice. I would also liked to contribute more to the shots that we were taking and perhaps had a bit more input when selecting which shots to do and why. Overall I am pleased with my performance and I feel I put in a lot of effort within the group to make our shoot successful. 

Friday, 20 March 2015

To further develop my game I have done numerous things. I have made my background move, created a start menu where you press 'Play' to begin the game and I have created a pause button which freezes the game by pressing the 'P' key and unfreezes after you press the key again.

I began with making my background scroll across, to look like the ship is moving in space. To do this, Luke showed me a simple piece of coding.

This 'ScrollSpeed' text allows for me to change the speed I want the background to go at in the game, for now set at '1' as shown under the void update. 'Vector2' for example simply means that the game is a 2-D game. The 'rendered.shared.Material.SetTextureOffset...' simply sets the positioning of the background, meaning it will move the background material in game.

I then moved onto making a simple menu for my game. To do this I needed to create a new scene and call it 'Play Game (Start Menu)
Unity file in game. 

I then had to create a new UI Button by going from GameObject > UI > Button. 
I then changed the settings for the button around the text and the text around the button by changing the colour and highlighted colour of the button and the colour of the text to something more suitable. I also downloaded a free space font from 'Dafont.com' to make my game more space themed.
 Settings for my button.
Setttings for my 'Text', with a custom font. 

I then created an empty object and called it 'Manager' to allow the scene to change from one to another. I then created a 'Change Scene' script to allow this to happen. This was found through a YouTube tutorial on how to make a menu for your game.

I then attached this script to the manager and the 'Canvas', which is the collection of my button and text.
'_Manager' in game. 

'Change Scene' Script. 

The script allows for it to use this scene and change it to the next. This is done by changing the build settings to allow the 'Play Game' scene to appear first, followed by my actual game. The 'Add Current' button adds my scene to the build so it will appear in the game when it runs. 
The 'Build Settings' for my game 

To make the scene change successfully, we have to add the manager to the left hand side, under 'Runtime Only' and add the 'Space Shooter' unity game to the 'ChangeScene.ChangeToScene' option in the drop down menu.
 The settings to 'On Click ()' 
Changing the option to 'ChangeToScene (string) to allow the actual game to appear after clicking the play game button.


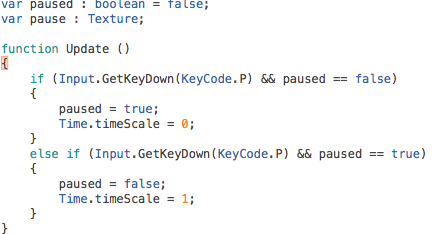
I finally created a simple pause function. To do this I created a new script called 'PauseScreen' and attached it to my Player to pause the game.

This script allows for the 'P' key to pause everything within the game (Input.GetKeyDown(KeyCode.P). The 'Time.timeScale =...' means the time taken for the game to pause and un-pause.


Overall i'm really pleased with the development i've made to my game (Adding my own ship/asteroid/UFO, changing the background, making it move, adding a pause/start function, having multiple objects fall and changing the score value of each object). I feel I understand coding a lot better now thanks to Luke and I would feel quite more confident than I have prior to the lessons in producing my own game in the future. When starting the project I found it difficult because I've had no previous experience in game programming, however I feel I have progressed well and now understand the basics of making a game. If I would've had more time I would've made an enemy ship or perhaps made the game multiplayer to further develop my game, which I may look into working on after the unit has been completed.

Wednesday, 18 March 2015

I did a brief test from home using a pair of shoes and the techniques suggested online and in an animation book called 'The Animation Book- A complete guide to animated filmmaking.....' suggesting I take into consideration lighting and movements behind my subject such as wind blowing trees etc.  I was also shown how to create the Pixillation process through a tutorial on YouTube.

'The Animation Book' by Kit Laybourne. 
YouTube Tutorial on the Pixillation technique

Short test 

I feel the test was interesting, however for my next test I will make a longer piece, possibly with a subject and try to make them slide across the floor, move in a circle and possibly float also, to make it visually look more interesting than just a sideward movement. I want to use this filming method in my final piece and hope to get some interesting footage over this weekend in preparation for shooting next week.

Monday, 16 March 2015

After we finished the workshops with Tanguy I decided to make some minor tweaks to my objects. I firstly added my own texture and changed the colour to my Spaceship. I also added a gun at the front to make it look more realistic and to make it look like the ship has a gun.
 Front of my ship
 Back of my ship
New texture for my ship 

I then re-did my asteroid's UV to something more clear meaning it would be easier to customise. 
New UV map of my asteroid.
With all my objects exported, I decided to use them in my Space Shooter game for the other unit, Interactivity. I feel proud of the effort I put in and hours of UV mapping each object properly. Im happy with the output of each object and because of this I put it in my Space Shooter game. I enjoyed using 'Sculptris' as I found it gave good alternative results to using Maya and could make really realistic looking objects such as the 'Moon' I made:
Imported 'Sculptris' file in Maya. 
I don't think i'm at a professional level of making 3-D objects, however I feel confident now going into Maya and making different shapes, which I didn't think I could do when I began the project. I feel Tanguy showed us how to do each object very clearly and the help he gave us was also very useful. I would like to further develop my knowledge in Maya and I hope to play around with the program in the future and see if I can make anything a bit more advanced. 

Saturday, 14 March 2015

After we had finished the basics, I decided to  customise my game and add some further elements. I began by customising the background to my game. I found a star texture on the internet and changed the image by colour correcting it.

Customised background.

I then imported my own ship into my game and added all of the components and scripts to it. I further customised my own ship by adding a texture and colour correcting it. 

 Spaceship in game. 

 Custom ship texture in Photoshop. 

Texture added to my ship. 

I then changed my 'GameController' script to allow multiple items tumbling down my game. To do this, Luke showed me a simple piece of code that allows more than one hazard to occur. This means I can import my own models. 


I then imported my other models I made in Maya. These were my own Asteroid and my own UFO. I imported these into my game by exporting them in Maya as 'FBX' files, and then added the textures separately. I then took the settings from the asteroid such as the the scripts and capsule collider's and moved them onto my UFO and Asteroid. 

 Copied scripts from the Asteroid to my custom asteroid. 

Edited capsule colliders for my Asteroid and UFO.

Luke then showed me how to make my UFO spin instead of tumble, so he helped me create a new script hat allows for the axis on the UFO to spin instead. 

Script in game. 

Script created to allow the UFO to spin rather than tumble. 

Multiple objects in my game. 

I then decided to change the value of each object. For example, my custom asteroid is worth '20' points rather than 10 points you get from the normal asteroid's. I also made my asteroid tumble more and fall quicker than the regular asteroid's by changing the mover speed. I also made my UFO worth 50 points and made it move even quicker and spin instead of just rotate. 


I then decided to change the bolt colour to a different colour that I felt would suit my game better. 


Changed Bolt colour to green. 

I then decided to add another asteroid to my game and change the size of it. I used the same design as the original asteroid however I increased the speed, points value and tumble speed to make it more difficult to shoot. 

Smaller Asteroid prefab. 

Changed settings. 

 I then customised my UFO more by making the explosion sound effect different to the asteroid's. To do this, I used a different sound prefab. This was 'explosion_enemy' rather than 'explosion_asteroid'.


To develop my game further I plan on making a start menu and pause menu. 

Thursday, 12 March 2015

During today's lesson we were shown how to add sound effects such as asteroid and ship explosion sounds and pieces of text to our game i.e. score count and game over text.

We began by adding sound effects to our asteroid explosion and ship explosion.

 Adding a component to my explosion prefab under the 'Audio' section, selecting 'Audio Source'. 

 'explosion_player' sound effect added to our 'explosion_player' prefab. 

 'explosion_asteroid' sound effect added to our 'explosion_asteroid' prefab. 

'explosion_enemy' sound effect added to our 'explosion_enemy' prefab. 

I then started adding text to my game by importing 3 different texts by creating a new 'UI  > Text' 


Three created UI text's

We then edited our 'GameController' text to allow our text in game and for our 'ScoreText' to change as you hit the asteroid prefab. We also added a restart function using the 'RestartText' we created. The 'Void Start()....' allowed for the number to increase when you shoot an asteroid, along with the 'Public void AddScore'. The 'if (restart)...' function allowed for the 'R' key input to restart the game, with the if statement under it referencing to the text saying 'Press 'R' to Restart' (RestartText in our game). 


I then edited all my pieces of text by moving it to the correct position and setting the size, font, color and so on.


'Game Over' settings.

We then added more pieces of code to our 'DestroyByContact' script. The coding below allowed the score value to increase when you shoot the asteroid. The 'GameController' variable allows the functionality of the 'AddScore' variable. 


This was our last lesson with Luke and I feel confident using Unity now, and I plan to go off and customise my game further. 
 
© 2012. Design by Main-Blogger - Blogger Template and Blogging Stuff